
Windows 7 64-bit on Disk with License Key: A Comprehensive Guide
Are you looking to install Windows 7 64-bit on your computer? Do you have a license key but are unsure how to proceed? This guide will walk you through the entire process, from obtaining the license key to installing the operating system. Let’s dive in!
Understanding Windows 7 64-bit

Windows 7 64-bit is an operating system designed for computers with 64-bit processors. It offers several advantages over the 32-bit version, including improved performance and the ability to handle larger amounts of memory. Before you begin the installation process, it’s essential to ensure that your computer meets the minimum system requirements.
| Component | Minimum Requirement |
|---|---|
| Processor | 1 GHz or faster 64-bit (x64) processor |
| Memory | 2 GB RAM (32-bit) or 4 GB RAM (64-bit) |
| Hard Disk Space | 16 GB available disk space (32-bit) or 20 GB (64-bit) |
| Graphics Card | DirectX 9 graphics device with WDDM 1.0 or higher driver |
Once you’ve confirmed that your computer meets these requirements, you can proceed to obtain the license key.
Obtaining a License Key
There are several ways to obtain a Windows 7 64-bit license key. You can purchase a new license key from Microsoft or a third-party vendor, or you can find a key online. However, it’s crucial to ensure that you obtain a legitimate key to avoid potential legal issues and malware risks.
Here are some options for obtaining a license key:
- Microsoft Store: Purchase a new license key directly from the Microsoft Store. This is the most reliable and secure option.
- Third-party vendors: You can find license keys from various online vendors. Be cautious and ensure that the vendor is reputable and offers a money-back guarantee.
- Online key generators: Avoid using online key generators, as they often contain malware and are illegal.
Installing Windows 7 64-bit
Once you have a valid license key, you can proceed to install Windows 7 64-bit on your computer. Here’s a step-by-step guide to help you through the process:
- Insert the installation disc: Place the Windows 7 installation disc into your computer’s optical drive.
- Boot from the disc: Restart your computer and enter the BIOS settings to change the boot order. Set the optical drive as the first boot device.
- Start the installation: Press any key when prompted to start the installation process.
- Accept the license terms: Read and accept the license terms to proceed.
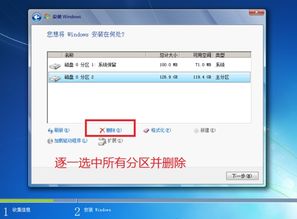
- Choose the installation type: Select “Custom (advanced)” to install Windows 7 on a new partition.
- Partition your hard drive: Create a new partition for Windows 7 and format it with NTFS.
- Install Windows 7: Follow the on-screen instructions to complete the installation process.
- Enter the license key: When prompted, enter the license key you obtained earlier.
- Complete the setup: Set up your user account and personalize your settings.
Activating Windows 7
After installing Windows 7, you’ll need to activate it to ensure that it’s genuine and to receive updates. Here’s how to activate Windows 7:
- Open the System Properties: Click on the Start button, right-click on “Computer,” and select “Properties.” Alternatively, you can press Windows +


