
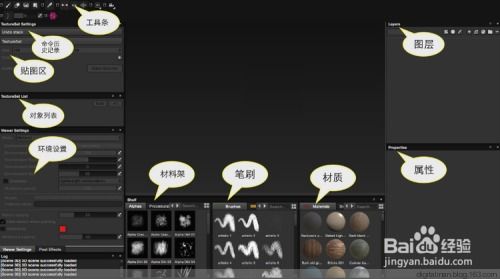
Transforming Substance Painter Textures to 8-bit: A Comprehensive Guide for Artists
As a digital artist, you’ve likely spent countless hours crafting textures in Substance Painter. The software’s powerful tools and features allow for intricate details and vibrant colors, but what if you need to convert your textures to 8-bit for a specific project? This guide will walk you through the process of converting your Substance Painter textures to 8-bit, ensuring your work remains visually striking while adapting to the limitations of the format.
Understanding 8-bit Textures

Before diving into the conversion process, it’s essential to understand what 8-bit textures are. An 8-bit texture is a digital image that uses 8 bits per pixel to represent color information. This results in a color palette of 256 colors, which can be quite limited compared to the millions of colors available in a standard 24-bit image. Despite this limitation, 8-bit textures can be incredibly effective when used correctly.
One of the primary advantages of 8-bit textures is their file size. They are significantly smaller than higher-bit textures, making them ideal for web use, game development, and other applications where bandwidth or storage space is a concern. Additionally, 8-bit textures can add a unique aesthetic to your work, reminiscent of early video games and pixel art.
Preparing Your Substance Painter Project
Before you begin the conversion process, ensure your Substance Painter project is well-prepared. Here are some steps to follow:
-
Finalize your texture details: Make sure all your textures are complete and have the desired level of detail. This will help maintain the quality of your 8-bit textures.
-
Adjust color settings: Since 8-bit textures have a limited color palette, it’s essential to choose a color scheme that works well within the constraints. Consider using a color picker tool to select colors that complement each other.
-
Optimize your project: Remove any unnecessary layers or details that won’t be visible in the 8-bit version. This will help reduce the file size and improve performance.
Converting Your Textures to 8-bit
Once your Substance Painter project is prepared, you can begin the conversion process. Here’s a step-by-step guide:
-
Export your textures: In Substance Painter, go to the “File” menu and select “Export.” Choose the desired format (e.g., PNG, JPG) and click “Export.” Save the exported textures to a folder on your computer.
-
Open the exported textures in an image editor: Use an image editor like Adobe Photoshop or GIMP to open the exported textures. These editors offer tools to convert images to 8-bit.
-
Convert to 8-bit: In your image editor, go to the “Image” menu and select “Mode.” Choose “8-bit Color” from the dropdown menu. This will convert your textures to 8-bit, reducing the color palette to 256 colors.
-
Adjust the color palette: After converting to 8-bit, you may notice that some colors are not represented in the limited palette. Use the “Color Balance” or “Hue/Saturation” tools to adjust the color palette and ensure your textures look their best.
-
Save your 8-bit textures: Once you’re satisfied with the color adjustments, save your 8-bit textures in the desired format. These textures are now ready for use in your project.
Table: Comparison of Bit Depth
| Bit Depth | Color Palette | File Size | Applications |
|---|---|---|---|
| 8-bit | 256 colors | Small | Web, game development |
| 24-bit | 16.7 million colors | Large | Print, high-quality displays |
Optimizing Your 8-bit Textures
After converting your textures to 8-bit, you may want to optimize them further. Here are some tips:
- <


