Fluent Bit: A Comprehensive Guide to Your Logging Needs
Are you looking for a robust and efficient logging solution for your systems? Look no further than Fluent Bit. This versatile and powerful tool is designed to handle logging tasks with ease, making it an essential component for any IT infrastructure. In this detailed guide, we’ll explore the various aspects of Fluent Bit, from its installation to its configuration and usage.
What is Fluent Bit?

Fluent Bit is an open-source, lightweight logging agent that can be used to aggregate, filter, and forward logs from various sources. It is designed to be easy to use and highly efficient, making it an ideal choice for both small and large-scale applications. Fluent Bit is built on top of the popular Fluentd project and shares many of its features, but with a more streamlined and optimized architecture.
Why Use Fluent Bit?

There are several reasons why Fluent Bit is a great choice for your logging needs:
-
High Performance: Fluent Bit is designed to be fast and efficient, processing logs at high speeds without compromising on quality.
-
Scalability: Fluent Bit can handle large volumes of logs, making it suitable for both small and large-scale applications.
-
Flexibility: Fluent Bit supports a wide range of input and output plugins, allowing you to easily integrate it with your existing logging infrastructure.
-
Security: Fluent Bit supports various security features, including TLS encryption and authentication, to ensure the confidentiality and integrity of your logs.
Installing Fluent Bit

Installing Fluent Bit is straightforward and can be done in a few simple steps:
-
Download the Fluent Bit package from the official website.
-
Extract the package to a directory on your system.
-
Configure Fluent Bit by editing the configuration file.
-
Start the Fluent Bit service.
For more detailed instructions on installing Fluent Bit, refer to the official documentation.
Configuring Fluent Bit
Configuring Fluent Bit involves creating a configuration file that specifies the input, filter, and output plugins you want to use. Here’s an example configuration file:
[SERVICE] Flush 1 Daemon Off LogLevel info ParsersFile parsers.conf[INPUT] Name tail Path /var/log/containers/.log Parser docker Tag kube.[OUTPUT] Name stdout Match kube.In this example, we’re using the tail input plugin to read logs from the /var/log/containers/ directory, the docker parser to parse the logs, and the stdout output plugin to output the logs to the console.
Using Fluent Bit with Kubernetes
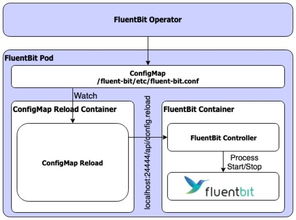
Fluent Bit is fully compatible with Kubernetes, making it an excellent choice for logging in a containerized environment. To use Fluent Bit with Kubernetes, you can deploy it as a sidecar container in your pods. Here’s an example deployment configuration:
apiVersion: apps/v1kind: Deploymentmetadata: name: fluent-bitspec: replicas: 1 selector: matchLabels: app: fluent-bit template: metadata: labels: app: fluent-bit spec: containers: - name: fluent-bit image: fluentbit/fluent-bit args: - -c - /fluent-bit/config.conf - -p - /fluent-bit/plugins ports: - containerPort: 24224In this example, we’re deploying Fluent Bit as a sidecar container in a pod that runs your application. The Fluent Bit configuration file is located at /fluent-bit/config.conf, and the plugins directory is located at /fluent-bit/plugins.
Conclusion
Fluent Bit is a powerful and versatile logging tool that can help you manage your logs more effectively. With its high performance, scalability, and flexibility, Fluent Bit is an excellent choice for any IT infrastructure. By following this guide, you should now have a good understanding of how to install, configure, and use Fluent Bit to meet your logging needs.


