
Windows Upgrade Python to 64-bit: A Comprehensive Guide for Users
Upgrading Python to a 64-bit version on Windows can significantly enhance your computing experience. It allows for better performance, improved compatibility with certain libraries, and access to more memory. In this detailed guide, I will walk you through the process step by step, ensuring a smooth transition from a 32-bit to a 64-bit Python installation.
Why Upgrade to 64-bit Python?

Before diving into the upgrade process, let’s understand why it’s beneficial to switch to a 64-bit version of Python. Here are a few reasons:
-
Increased memory usage: A 64-bit Python installation can utilize more memory, which is particularly useful for large datasets and complex applications.
-
Improved performance: 64-bit Python can execute certain operations faster, leading to better overall performance.
-
Compatibility with libraries: Some libraries and modules are only available in 64-bit versions, so upgrading to a 64-bit Python installation ensures you can access all the necessary tools.
Checking Your Current Python Version
Before proceeding with the upgrade, it’s essential to determine your current Python version. To do this, open a command prompt and type the following command:
python --version
This will display the version of Python currently installed on your system. If it’s a 32-bit version, you’ll need to proceed with the upgrade process.
Uninstalling the 32-bit Python Installation

Before installing the 64-bit version, you must uninstall the 32-bit Python installation. To do this, follow these steps:
-
Open the Control Panel on your Windows computer.
-
Click on “Programs” and then “Programs and Features.” This will open the Programs and Features window.
-
Scroll through the list of installed programs and locate Python. Select it and click “Uninstall.” Follow the prompts to complete the uninstallation.
Downloading and Installing the 64-bit Python Version
Now that you’ve uninstalled the 32-bit Python installation, it’s time to download and install the 64-bit version. Here’s how to do it:
-
Visit the official Python website (python.org) and navigate to the “Downloads” section.
-
Click on the “Windows x86-64 executable installer” link to download the 64-bit version of Python.
-
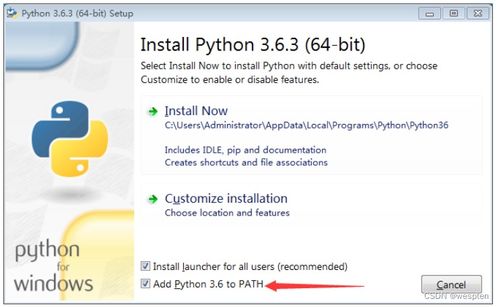
Once the download is complete, run the installer and follow the on-screen instructions. Make sure to check the box that says “Add Python 3.x to PATH” during the installation process.
-
After the installation is complete, open a command prompt and type the following command to verify that the 64-bit version is installed:
python --version
This should now display the 64-bit version of Python installed on your system.
Verifying the Upgrade
After installing the 64-bit version of Python, it’s crucial to verify that the upgrade was successful. Here are a few steps to follow:
-
Open a command prompt and type the following command:
pip --version
This will display the version of pip installed on your system. If it matches the version of Python you just installed, the upgrade was successful.
-
Try running a Python script that requires a 64-bit version of Python. If it runs without any issues, you’ve successfully upgraded to a 64-bit Python installation.
Conclusion
Upgrading Python to a 64-bit version on Windows can provide numerous benefits, including increased memory usage, improved performance, and compatibility with certain libraries. By following this comprehensive guide, you can easily transition from a 32-bit to a 64-bit Python installation and enjoy a more efficient and powerful computing experience.
Table: Comparison of 32-bit and 64-bit Python Versions
| Feature | 32-bit Python | 64-bit Python
Related PostsLike |
|---|


