
Java Download 64 Bit: A Comprehensive Guide for Users
Are you looking to download the 64-bit version of Java for your computer? If so, you’ve come to the right place. In this article, we will delve into the intricacies of downloading and installing the 64-bit version of Java, ensuring that you have a seamless experience. We will cover everything from the importance of Java to the technical aspects of the download process.
Why is Java Important?

Java is a widely-used programming language and platform that enables the development and execution of applications across various devices. Its “write once, run anywhere” principle makes it a versatile choice for developers. Here are a few reasons why Java is important:
- Platform Independence: Java applications can run on any device with a Java Virtual Machine (JVM), making it a universal choice for cross-platform development.
- Security: Java provides robust security features, making it a preferred choice for enterprise-level applications.
- Scalability: Java is designed to handle large-scale applications, making it suitable for both small and large businesses.
Understanding 64-bit Java
When you download Java, you have the option to choose between the 32-bit and 64-bit versions. Here’s what you need to know about the 64-bit version:
- Memory Addressing: The 64-bit version of Java allows your computer to access more memory, which can be beneficial for resource-intensive applications.
- Performance: Generally, the 64-bit version of Java offers better performance compared to the 32-bit version, especially on systems with a large amount of RAM.
- Compatibility: Some applications may require the 64-bit version of Java to function correctly.
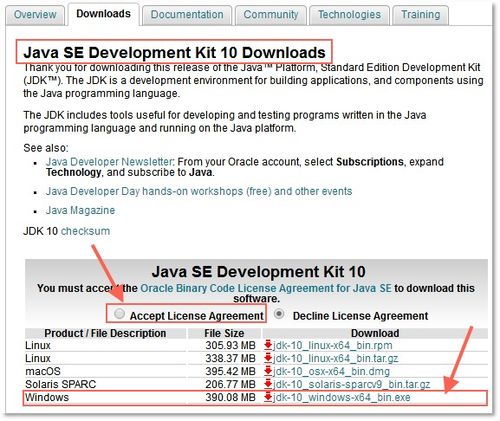
How to Download 64-bit Java

Follow these steps to download the 64-bit version of Java:
- Visit the official Oracle Java website (https://www.oracle.com/java/technologies/javase-downloads.html).
- Under the “Java SE Development Kit (JDK)” section, click on the “Download” button.
- Select the appropriate version of Java (e.g., Java 17, Java 16, etc.) and click on the “Download” button.
- Choose the 64-bit version of Java (x64) from the available options.
- Save the downloaded file to your computer.
How to Install 64-bit Java
Once you have downloaded the 64-bit Java installer, follow these steps to install it:
- Double-click the downloaded installer file to launch the installation wizard.
- Follow the on-screen instructions to proceed with the installation.
- During the installation process, you may be prompted to accept the license agreement. Click “I accept” to continue.
- Select the installation location for Java. You can choose the default location or specify a custom location.
- Choose the components you want to install. It is recommended to select all components for a complete installation.
- Click “Next” to proceed.
- Select the JVM (Java Virtual Machine) options. You can choose to install the JVM for all users or just for your user account.
- Click “Next” to continue.
- Select the installation type. You can choose to install Java as a standalone application or as part of a custom application.
- Click “Next” to proceed.
- Select the installation directory for Java. You can choose the default directory or specify a custom directory.
- Click “Next” to continue.
- Select the components you want to install. It is recommended to select all components for a complete installation.
- Click “Next” to proceed.
- Select the JVM (Java Virtual Machine) options. You can choose to install the JVM for all users or just for your user account.
- Click “Next” to continue.
- Select the installation type. You can choose to install Java as a standalone application or as part of a custom application.
- Click “Next” to proceed.
- Select the installation directory for Java. You can choose the default directory or specify a custom directory.
- Click “Next” to continue.
<


