
ISO Windows 7 32 Bits: A Comprehensive Guide
Are you looking to install or upgrade to Windows 7 32-bit? This operating system, released by Microsoft, has been a popular choice for many users due to its stability and compatibility with a wide range of hardware. In this article, we will delve into the details of ISO Windows 7 32-bit, covering its features, system requirements, installation process, and more.
What is ISO Windows 7 32-bit?

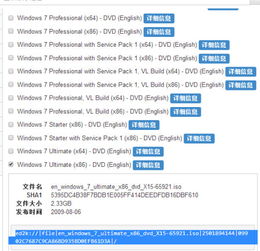
ISO Windows 7 32-bit is a disk image file that contains the installation files for Windows 7 32-bit operating system. It is often used for creating bootable USB drives or burning installation DVDs. The ISO file format is a standard for distributing software and operating systems, allowing users to easily install or upgrade their systems.
System Requirements
Before installing Windows 7 32-bit, it is essential to ensure that your computer meets the minimum system requirements. Here is a table summarizing the key requirements:
| Component | Minimum Requirement |
|---|---|
| Processor | 1 GHz or faster 32-bit (x86) or 64-bit (x64) processor |
| Memory | 1 GB RAM (32-bit) or 2 GB RAM (64-bit) |
| Hard Disk Space | 16 GB available disk space (32-bit) or 20 GB (64-bit) |
| Graphics Card | DirectX 9 graphics device with WDDM 1.0 or higher driver |
These requirements are the minimum needed to run Windows 7 32-bit. However, for a better experience, it is recommended to have a faster processor, more RAM, and a dedicated graphics card.
Downloading and Creating a Bootable USB Drive
Once you have confirmed that your computer meets the system requirements, you can proceed to download the ISO file from Microsoft’s official website. After downloading, you will need to create a bootable USB drive to install Windows 7 32-bit. Here’s how to do it:
- Download a USB flash drive tool, such as Rufus or Windows 7 USB/DVD Download Tool.
- Connect a USB flash drive to your computer.
- Open the USB flash drive tool and select the ISO file you downloaded.
- Follow the on-screen instructions to create the bootable USB drive.
Once the process is complete, you can boot your computer from the USB drive and proceed with the installation.
Installation Process
Here’s a step-by-step guide to installing Windows 7 32-bit from the bootable USB drive:
- Insert the bootable USB drive into your computer and restart it.
- Press the appropriate key (usually F2, F10, or Del) to enter the BIOS or UEFI settings.
- Change the boot order to prioritize the USB drive.
- Save the changes and exit the BIOS/UEFI settings.
- Follow the on-screen instructions to install Windows 7 32-bit.
During the installation process, you will be prompted to choose the installation type, partition your hard drive, and enter your product key. Make sure to follow the instructions carefully to avoid any errors.
Post-Installation Steps
After installing Windows 7 32-bit, you may need to perform some post-installation steps to ensure your system runs smoothly:
- Update your drivers: Visit the manufacturer’s website for your hardware components and download the latest drivers.
- Install essential software: Install essential software such as antivirus, office suite, and web browser.
- Customize your settings: Personalize your desktop, taskbar, and other settings to your liking.
By following these steps, you can ensure that your Windows 7 32-bit system is up-to-date and optimized for your needs.
Conclusion
ISO Windows 7


