
Tiny 10 ISO Download: A Comprehensive Guide for 64-bit Windows 10 Users
Are you looking for a lightweight version of Windows 10 that doesn’t compromise on performance? Look no further than Tiny 10 ISO. This miniaturized version of Windows 10 is designed to provide a fast and efficient computing experience, especially for older hardware. In this article, we will delve into the details of downloading and using the Tiny 10 ISO for 64-bit Windows 10 users.
What is Tiny 10 ISO?

Tiny 10 ISO is a modified version of the Windows 10 operating system that has been stripped down to its essentials. It is created by enthusiasts who aim to provide a faster and more responsive system for users with limited hardware resources. By removing unnecessary bloatware and features, Tiny 10 ISO ensures that your system runs smoothly without any lag or performance issues.
Why Choose Tiny 10 ISO for 64-bit Windows 10?
There are several reasons why you might consider using Tiny 10 ISO for your 64-bit Windows 10 system:
-
Improved Performance: With its minimalistic approach, Tiny 10 ISO offers a faster and more responsive computing experience compared to the standard Windows 10 installation.
-
Reduced Resource Consumption: By removing unnecessary features and bloatware, Tiny 10 ISO consumes less CPU, memory, and disk space, making it an ideal choice for older hardware.
-
Customization: Tiny 10 ISO allows you to customize your system to suit your needs, including choosing which features and applications to install.
-
Security: With fewer features and bloatware, Tiny 10 ISO is less susceptible to security vulnerabilities and malware attacks.
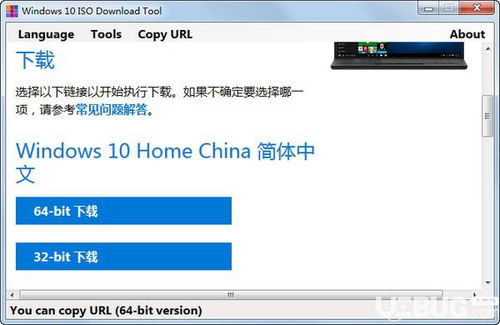
How to Download Tiny 10 ISO
Downloading Tiny 10 ISO is a straightforward process. Follow these steps to get started:
-
Visit the official Tiny 10 website or a trusted source that offers the ISO file.
-
Select the 64-bit version of Tiny 10 ISO for your system.
-
Click on the download link and wait for the file to be downloaded to your computer.
-
Once the download is complete, you can proceed to create a bootable USB drive or burn the ISO file to a DVD.
Creating a Bootable USB Drive
Creating a bootable USB drive is essential for installing Tiny 10 ISO on your system. Here’s how to do it:
-
Download a USB flash drive creation tool, such as Rufus or balenaEtcher.
-
Connect a USB flash drive to your computer.
-
Open the USB flash drive creation tool and select the Tiny 10 ISO file as the source.
-
Follow the on-screen instructions to create the bootable USB drive.
-
Once the process is complete, you can use the bootable USB drive to install Tiny 10 ISO on your system.
Installing Tiny 10 ISO
Now that you have a bootable USB drive, you can proceed to install Tiny 10 ISO on your system. Here’s how to do it:
-
Insert the bootable USB drive into your computer and restart it.
-
Access the BIOS or UEFI settings by pressing the appropriate key (e.g., F2, Del, or Esc) during the boot process.
-
Change the boot order to prioritize the USB drive.
-
Save the changes and exit the BIOS or UEFI settings.
-
Follow the on-screen instructions to install Tiny 10 ISO on your system.
Post-Installation Tips
After installing Tiny 10 ISO, here are some tips to ensure a smooth experience:
-
Update your drivers: Visit the manufacturer’s website to download and install the latest drivers for your hardware components.
-
Install essential applications: Install the applications you need, such as a web browser, office suite, and antivirus software.


