
micro:bit: Your Gateway to the World of Programming
Are you intrigued by the world of programming and electronics? Do you want to dive into the fascinating realm of technology but feel overwhelmed by complex tools and languages? Look no further! The micro:bit is here to make your journey into programming a breeze. In this comprehensive guide, I’ll walk you through everything you need to know about the micro:bit, from its features and capabilities to how to get started with programming.
What is the micro:bit?

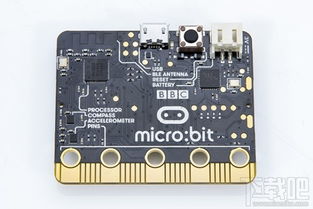
The micro:bit is a tiny, credit card-sized computer developed by the BBC in collaboration with a range of partners, including Microsoft, ARM, and the University of Lancaster. It’s designed to inspire and educate young people, especially those aged 11-12, to learn programming and electronics. The micro:bit is small enough to fit in your pocket, yet it’s packed with features that make it a powerful tool for learning and creativity.
Features of the micro:bit
Here’s a breakdown of the key features that make the micro:bit a standout device:
| Feature | Description |
|---|---|
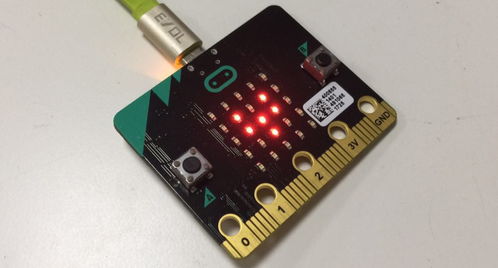
| LED Matrix | 25 individually programmable LEDs that can display text, patterns, and animations. |
| Buttons | Two programmable buttons that can be used to trigger events or control the micro:bit. |
| Sensors | Light, temperature, and motion sensors that can detect changes in the environment and trigger actions. |
| Bluetooth | Bluetooth connectivity that allows the micro:bit to communicate with other devices and be controlled remotely. |
| USB Interface | A USB interface for connecting the micro:bit to a computer for programming and charging. |
With these features, the micro:bit is capable of a wide range of applications, from simple games and interactive art projects to more complex robotics and IoT devices.
Getting Started with Programming
One of the best things about the micro:bit is its ease of use. You don’t need any prior programming experience to get started. Here’s a step-by-step guide to help you get up and running:
-
Connect the micro:bit to your computer using a USB cable.
-
Download and install the micro:bit software. The official micro:bit website provides a range of options, including web-based editors and offline IDEs.
-
Choose a programming language. The micro:bit supports several languages, including Blocks, JavaScript, Python, and Scratch.
-
Start writing code. The micro:bit software provides a range of tutorials and examples to help you get started.
-
Upload your code to the micro:bit and watch it come to life!
Programming Languages for the micro:bit
The micro:bit supports several programming languages, each with its own strengths and use cases:
-
Blocks: A visual programming language that uses a drag-and-drop interface. It’s great for beginners and those who prefer a more visual approach to programming.
-
JavaScript: A popular programming language that’s used to create interactive web pages and applications. It’s a good choice for those who want to learn more advanced programming concepts.
-
Python: A versatile programming language that’s used in a wide range of applications, from web development to scientific research. It’s a good choice for those who want to learn a language that’s both powerful and easy to use.
-
Scratch: A visual programming language that’s designed for young people. It’s a great way to introduce kids to programming and creativity.
Community and Resources
The micro:bit has a vibrant community of users and developers who are always sharing new ideas and projects. Here are some resources to help you get started:
-
The official micro:bit website (www.microbit.org) provides a range of


