
Windows 10 ISO Download 64-bit: A Comprehensive Guide
Are you looking to download the Windows 10 ISO 64-bit version? If so, you’ve come to the right place. In this detailed guide, I’ll walk you through the process step by step, ensuring you have all the information you need to successfully download and install Windows 10 on your computer.
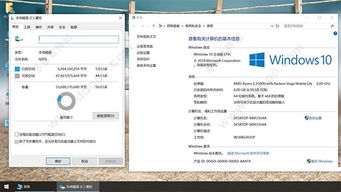
Why Choose Windows 10 ISO 64-bit?

Before diving into the download process, let’s understand why you might want to choose the Windows 10 ISO 64-bit version. The 64-bit version of Windows 10 offers several advantages over the 32-bit version, including:
- Better performance and stability
- Support for more RAM, up to 128GB
- Improved compatibility with modern hardware and software
Now that you know the benefits, let’s move on to the download process.
Step 1: Visit the Official Microsoft Website
The first step in downloading the Windows 10 ISO 64-bit version is to visit the official Microsoft website. To do this, simply open your web browser and navigate to https://www.microsoft.com/en-us/software-download/windows10.
Step 2: Choose the Edition and Language
Once you’re on the Microsoft website, you’ll see a list of available editions and languages. Select the edition of Windows 10 that you want to download, and then choose the language. For this guide, we’ll be downloading the Windows 10 Home edition in English.
Step 3: Select the 64-bit Version
After selecting the edition and language, you’ll be prompted to choose the version of Windows 10. Make sure to select the 64-bit version, as this is the one we’re focusing on in this guide.
Step 4: Create Bootable Media
Once you’ve selected the 64-bit version, you’ll be presented with two options: Create ISO or Create Bootable Media. For this guide, we’ll choose the Create Bootable Media option. This will allow you to create a bootable USB drive or DVD that you can use to install Windows 10 on your computer.
Step 5: Download the ISO File
After selecting the Create Bootable Media option, you’ll be prompted to enter your product key. If you don’t have a product key, you can still download the ISO file, but you’ll need to purchase a license later. Once you’ve entered your product key (or skipped this step), click the Confirm button to start the download process.
The download process may take some time, depending on your internet speed. Once the download is complete, you’ll have the Windows 10 ISO 64-bit file on your computer.
Step 6: Create Bootable Media
Now that you have the Windows 10 ISO 64-bit file, it’s time to create bootable media. You can use a USB drive or a DVD to create the bootable media. To create bootable media using a USB drive, you’ll need a tool like Rufus. To create bootable media using a DVD, you’ll need a tool like ImgBurn.
Here’s a brief overview of the process for each tool:
- Rufus: Download Rufus from https://rufus.ie/, run the program, select the Windows 10 ISO file, and click Start.
- ImgBurn: Download ImgBurn from https://www.ImgBurn.com/, open the program, select the Windows 10 ISO file, and click Write.
Once the bootable media is created, you can use it to install Windows 10 on your computer.
Step 7: Install Windows 10
With the bootable media created, it’s time to install Windows 10. Insert the USB drive or DVD into your computer, restart the computer, and boot from the bootable media. Follow the on-screen instructions to install Windows 10.
During the installation process, you’ll be prompted to enter your product key, choose the installation type, and select the partition where you want to install Windows 10. Once you’ve completed


